In thsi tiutorial you will learn how to repair a Classic Vespa Clutch. If you are planning a Classic Vespa restoration or you want to tackle your own repairs then at some time or another you will need to give the clutch attention.
Step 1
If you have not already done so you will need to remove the Clutch. If needed use the Instructions Here. 1
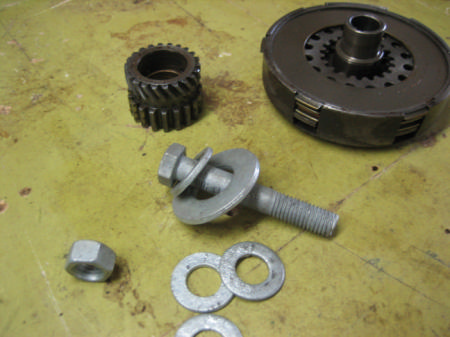
The only tool that you will need other than the regular mechanics tools is a clutch compressor. The first photo is a Piaggio Clutch compressor. You will see that it is basically a nut, bolt and washer. The purist will only ever use the Piaggio tools but you and may use a nut and bolt washer combination and it will do the same job.
 |
 |
Step 2
Insert the bolt part of the clutch to compress the top most plate. Use your thumbs to slightly press down the back plate. Do not over tighten the bolt. |
 |
Step 3
Remove the retaining ring. Using just enough force (you will feel what I mean) so that the retaining ring can be removed from the groove of the clutch basket. Be careful not to bend the ring - I use my fingers to push it inward and out wards. |
 |
Step 4
Remove the back plate.The clutch back plate is the only plate that has cork on one side (the inside) and metal on the outside. is metal. Remove the second plate, which has metal on both sides. then remove the third plate, which has cork on both sides. Now remove the 4th plate. Note it is exactly like the second; metal on both sides. |
 |
Step 5
Remove the final clutch plate and that is it the clutch should be apart. You will see a set of 6 or so springs that sit between the final plate and the clutch basket. Unless the springs are to be replaced do loose them. |
 |
Step 6
If you are only replacing your plates, you can simply reverse these steps and install the new plates in the reverse order that they came out. However always remember that the cork plates must be soaked in oil (SAE 30W or ST90 basically the same oil you use for the engine ) for a least 24 hours before installation. For a complete overhaul read on |
 |
Step 7
While the clutch is apart it's a good idea to inspect and clean everything and replace anything that may look worn out or broken. Slowly and carefully remove the clutch compressor. First remove the plate that has the gears on it. The photo is of an older version were the gear is not attached to the plate. |
 |
Step 8
Lift out the gear plate and you will see the clutch springs and caps. Replace all of the springs and if needed the caps. |
 |
Step 9
Put it all back together again and install the clutch back on the scooter and your done. |


