Courtesy : ScooterHelp.com
Oil Seals: Clutch Side
There are three main oil seals in a Vespa engine:
- Main bearing oil seal (at the crank): Keeps the gearbox oil from mixing with the oil/gas mixture.
- Flywheel side oil seal (at the crank): Keeps the oil/gas mix from the outside of the casing.
- Rear wheel oil seal: Seals the gearbox oil around the rear axle.
There are also some more minor seals around the kickstart quadrant, the clutch cover, and the rear wheel back plate.
The main seals should be replaced every time the engine is taken apart as they are cheap to buy but they are buried pretty deep in the engine. If you have the engine apart you might as well drop them in.
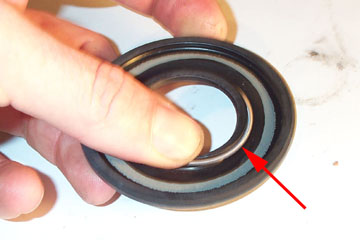
To remove the clutch side seal use a screw driver to poke it out through the main bearing. Fitting a new one is as easy as pushing it in to place. The main oil seal is made from rubber with a metal center and has a circular spring around a flexible lip. This spring must always face the pressure (i.e. the crank web). Above is a shot illustrating the ring (arrowed) with the rubber lip peeled back.

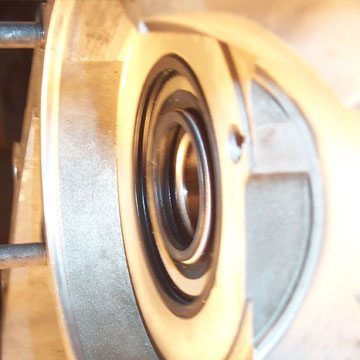
Above is the correct orientation of the clutch side oil seal. You can see the main bearing and circlip beyond. Older Vespas are similar except that the oil seal is outside the main bearing instead of inside. The difference is that when the bearing is on the crank side of the seal it is lubricated by the two stroke oil/gasoline mix, and when the bearing is on the outside of the oil seal it is lubricated by the transmission oil

Place the oil seal in with your fingers and push hard around the edges. Try to get the outer lip flush with the casing. This isn’t always possible and when it is stubborn you can use a large washer as long as the outer diameter of the washer is larger than the diameter of the seal. Use a hammer and tap the face of the washer until the washer is flush with the casing.
Above is a shot of the oil seal correctly placed. The lip is as tight as it can go in the casing even though it is not entirely flush.